Showing posts with label Sizzlits Die. Show all posts

Tuesday, August 6, 2013

Owl Builder Punch 50th Anniversary Card

Good morning. I have a new card for you using the owl builder punch and the stamp set "Memorable Moments." My mom asked me if I had the time to make her a 50th anniversary card to give to someone using the memorable moments stamp set. I am sure it is not what kind of card she was expecting, but I do believe she liked it.
 I have seen other demonstrators use the owl builder punch to make wedding cards, anniversary cards, and Valentine cards. I also seen a card made by someone that had the owl in a tree. That is where I got my idea from, but made it my way. I do not like to case a card. I like to make it my own by changing it some. This is the final result. There are a lot of different tools used to make this card and quite a bit of detail, but that is what makes it unique and special. I hope you enjoy it and realize it is not that hard to make when you do have the tools to create it.


Here are the Stampin' Up! supplies needed to create this card.
Stamp Set: Memorable Moments
Classic Ink: Crisp Cantaloupe, Early Espresso, and Island Indigo
Cardstock: Soft Suede, Naturals Ivory, Always Artichoke, and Soho Subway DSP
Tools: Owl Builder Punch, Big Shot, Ovals Collection Framelits, Bitty Banners Framelits, Circles Collection Framelits, Little Leaves Sizzlits, Woodgrain Embossing Folder, Stampin' Sponge
Embellishments: Subtles and Regals Candy Dots 

I do not know what the receivers of the card thought, but I do hope they liked it. It was a fun card to make.
Now go-n-stamp!!

Monday, October 22, 2012

Purple Thank You

I have a card to share with you. If you are a person that really likes purple, then this may be one you really like. This is the first card designed for my thank you card class. I have 2 others done, but need to make one more. I will be posting them very soon.

To make this card you will need elegant eggplant, perfect plum, very vanilla cardstock, and a little bit of first edition specialty designer series paper. You will need your big shot, the lacy brocade textured impressions embossing folder, fashionable hearts embosslits, and the delicate doilies sizzlits (largest one). The stamp sets used are from the From My Heart set and the Tiny Tags set. You also need a stampin' sponge, which I used on the designer series paper. I just about forgot one more thing. You will also need the 1 3/8" square punch to make the bottom of the designer series paper look like a ribbon.

I am sorry that the quality of the picture isn't the greatest. Once again, it is the lighting. They always look much better in person than on here. Sorry about that.

Have a wonderful day. Hopefully, you can get some stamping time in. I will be posting more in the next few days. Leave a comment if you want, otherwise, thank you so much for visiting. I hope you come back more often and you like what you see.

Now go-n-stamp!!

Sunday, February 6, 2011

All in the Folds

Have you ever looked at a card and knew right away that you want to try and make one too? That is exactly how I felt when I seen this card in the Stampin' Success Magazine (February 2011). It is not an exact duplicate of the one in the magazine, but it folds like it.

This card is very neat. It continuously unfolds over and over always returning to where you originally started. My daughter's birthday was coming up. I thought this would be neat to make for her. I waited to post it on here until she got it and seen it for herself. She and her husband both thought it was pretty neat.

The fun thing about the card is that it looks like it is very complicated to make. Guess what? It really isn't. The main thing is that your cuts have to be precise.


These are Stampin' Up! supplies I used to make this card.
Cardstock: basic gray, pretty in pink, concord crush, pink pirouette, very vanilla, and lap of luxury dsp
Ink: basic gray, concord crush
Stamp sets: sincere salutations and defining alphabet
Tools: build a cupcake punch, big shot, elegant lines embossing folder, backgrounds 1 texturz plates, dotted scallop ribbon border punch, beautiful wings embosslits die, swirls scribbles sizzlits die, scallop oval xl punch, 1 3/4" x 7/8" oval punch, 1/2" circle punch, 1 3/4" scallop circle punch, 1 1/4" circle punch, and 1 3/4" circle punch.
Thanks for taking the time to visit my blog. You can always leave a comment!
Now go-n-stamp!!

Saturday, May 22, 2010

I'm Sorry and Praying For You Class

On Tuesday, I am having a class where we will be making some cards that say, "I'm sorry and Praying for You." I decided "I'm Sorry" can be for apologizing or for sympathy, whichever one is needed at the time. If you are a praying person, of which I am, there are times the Lord lays someone on your heart. That would be a perfect time to send a "Praying for You" card.

I always try to make my cards different from each other. I know a lot of demonstrators tend to use the same colors or same designer series paper. I like to give a variety of colors. To be honest, my main customers love the color blue. I do try to always have a blue card for them.

I used the tropical party stamp set and the island oasis dsp to make the first card. These items can be ordered from the summer mini catalog. The stamp set (tropical party) is such a fun set to work with. I hope it will make it to the new catalog that will be coming out in July.

I love the nouveau chic dsp. I think it must have something to do with the colors used in it. I am trying to use up as much of my paper as possible that will be retiring soon.

I had to cheat a little bit and see how other people have used the stamp set "Three Little Words." Once I see other's ideas it was easy for me to come up with my own for this one. The dsp is pink flamingo.

Last of all, but certainly not the least is my blue card. I did use retired dsp on this one, everything else is current though. I used the stamp sets "Thoughts and Prayers" and "Itty Bitty Bits."
Please leave a comment telling me what you think of them. I always love to hear what you think.
I hope you are inspired by my cards to create some yourself. I always like to say, "If you can color, you CAN stamp."

Now go-n-stamp!!

Tuesday, May 11, 2010

Mother's Day Cards

I hope that you all had a wonderful Mother's Day. It isn't by mistake that I am just now posting these Mother's Day cards. I had to wait to make sure that the loved ones I sent them to did not see them before they got them.

The first card you see I made for my daughter's first Mother's Day. I wanted it to be special. I knew she loves the beach and even would like to go there. I thought that this fun and new stamp set would make a cute and unique mother's day card. I know it is not what you would think of for a mother's day card, but I also know that the recipient will love it. She isn't hard to please.

These are a list of supplies that I used to make this card. (Stampin' Up! only, of course :-) )

Cardstock: whisper white, so saffron, old olive, and island oasis dsp (summer mini catalog);
Stamp sets: tropical party (summer mini catalog) and all holidays; Ink: tempting turquoise, old olive, pumpkin pie, rose red, and always artichoke; Tools: ticket corner punch; Accessories: clear rhinestone brads, turquoise and yellow rhinestone brads, dazzling diamonds, and crystal effects

Now for my second card. I made this one for my mom. She loves flowers and always has since I can remember. There have been a lot of different ways of making flowers shown recently from other Stampin' Up! demonstrators. This one looked very simple to make, which is why I chose this one. Dawn Olchefske came up with the idea and you can watch a demonstration video of how it is done by going to her blog here. This technique is done by using re-inkers, the butterfly punch, shimmer paper, and a misting bottle. Remember if you do not have some of the supplies needed to make them you can always purchase them through me or come over and I will show you how.

These are the Stampin' Up! supplies I used to make this card.

Cardstock: perfect plum, so saffron, shimmer paper, whisper white, and old olive; Stamp set: well scripted (occasion mini catalog, no longer available); Ink: perfect plum and so saffron; Tools: big shot, sizzlits die little leaves and lots of tags, wide oval punch, butterfly punch, 1/16" hole punch, texturz plates backgrounds 1 flourish; Accessories: silver brads, clear rhinestone brad

Below is a close-up of the flowers. I put it into a clear envelope. I knew if I tried to put it into a regular envelope it would have smashed the flowers. I hand delivered it to my mom.
I hope you like them, are inspired to create a card yourself, and leave me a comment. I would love to hear your thought on them.

Now go-n-stamp!!

Saturday, April 24, 2010

Tuesday's Birthday Card Class

Welcome to my blog everyone. Thanks so much for stopping by to take a peak at my paper creations. I hope you like what you see and will visit often.

Here are the 4 different cards we will be making at my upcoming birthday card class. When everyone is finished with the class they will be taking home 8 cards total. They will have 2 cards of each of the 4 different designs.

I am always amazed. It seems like the one that is my least favorite, ends up being one that my family likes. We sure do have different tastes, probably a very good thing too.

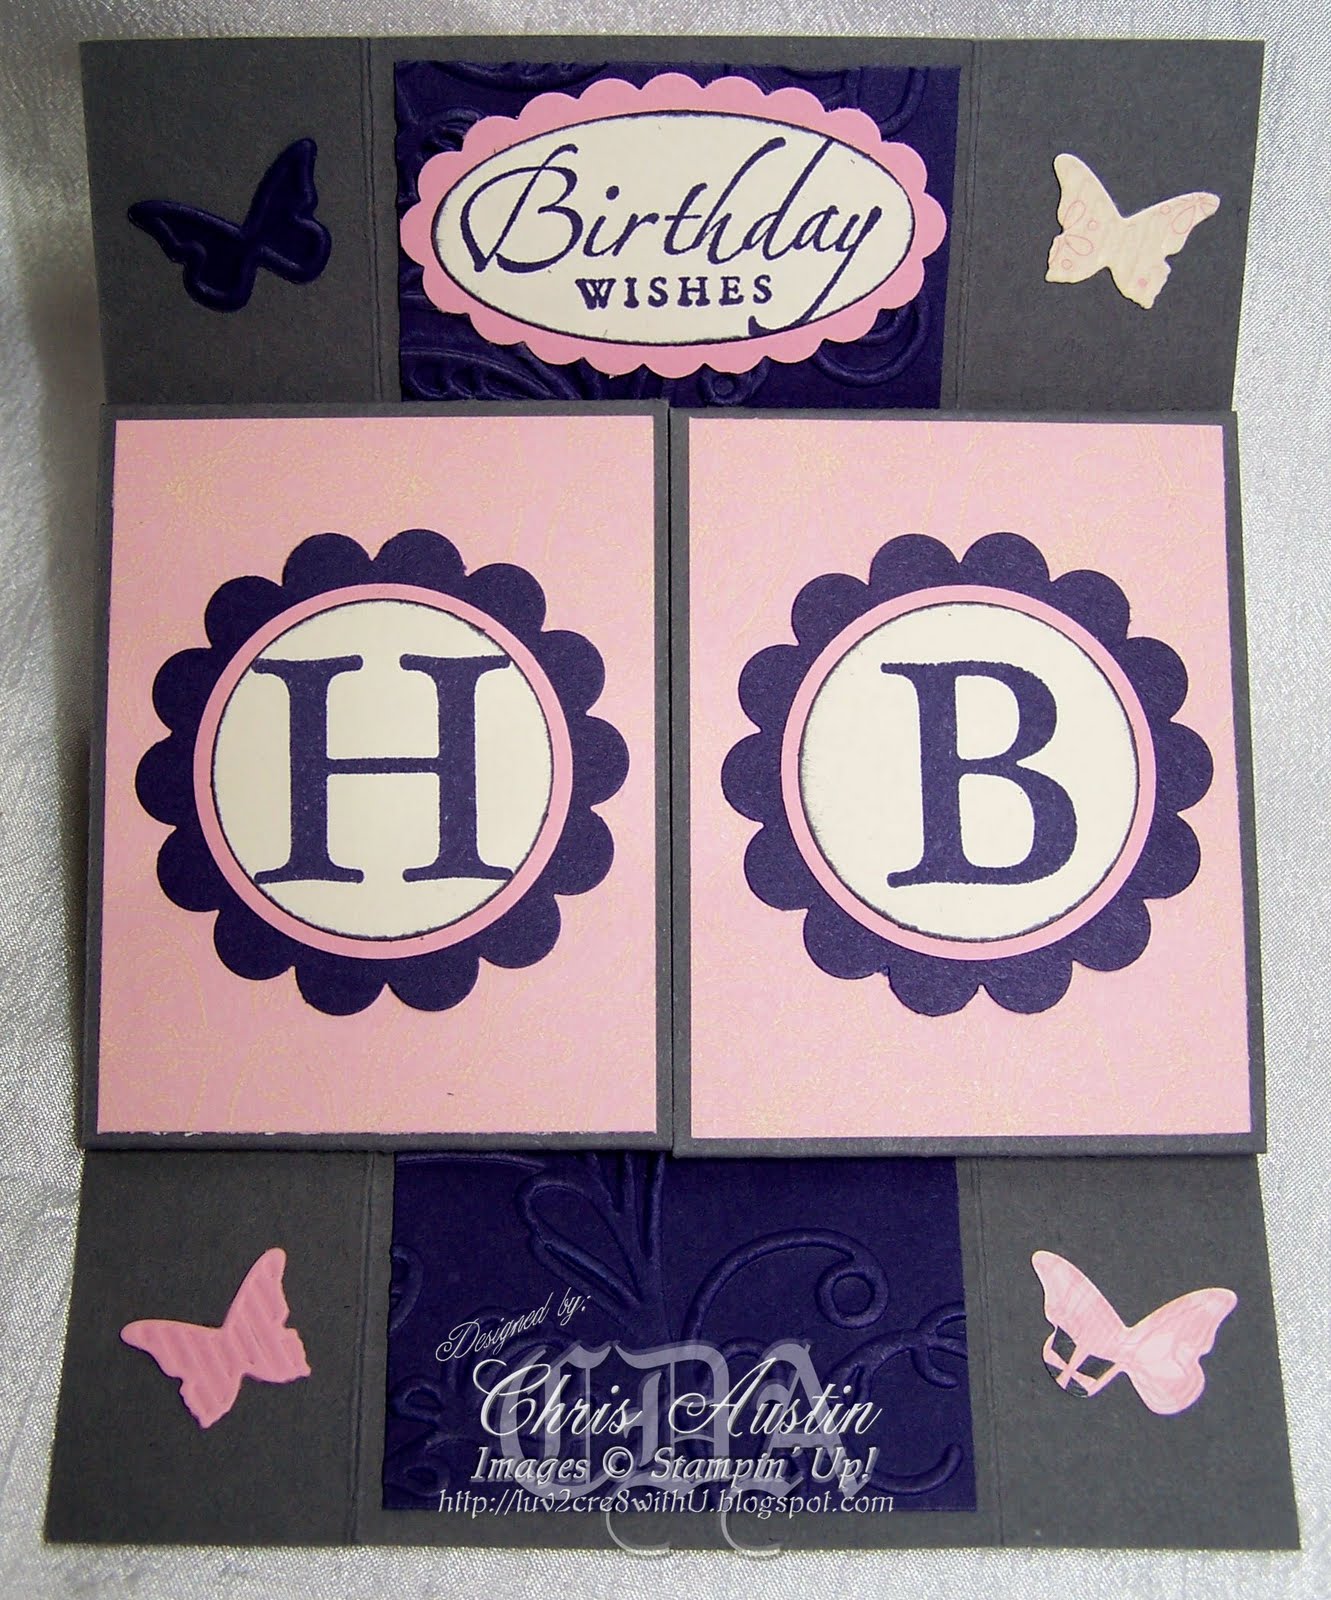
For this first card you see I used night of navy, brocade blue, basic gray, and naturals white cardstock. The stamp sets I used were fifth avenue floral and well scripted. Tools I used were the big shot, sizzlits lots of tags, ticket corner punch, eyelet border punch, and the wide oval punch. The only accessory is brocade blue 5/8" grosgrain ribbon.

For the 2nd card below, I used cameo coral, chocolate chip, real red, whisper white, and pink flamingo dsp. The stamp sets I used were out of the box and voila. For tools I used the big shot, bigz die two tags, white gel pen, scallop border punch, scallop circle punch, 1 3/4" circle punch, 1 1/4" circle punch, and the 1/16" hole punch. For accessories I used a real red brad from the bold brights and 5/8" chocolate chip grosgrain ribbon.

For the 3rd card I used taken with teal, pumpkin pie, whisper white, and sweet pea dsp. The stamp sets I used were fun & fast notes and sincere salutations. For tools I used the large oval punch and the scallop oval punch.

I wanted this to be a simple card. This is my least favorite, but my husband said he likes the color. Seeing this card in person looks much better than it does on here.

Lastly, which in reality, this was the very first card I had made. I wanted a card that could be used for anyone despite their gender. Stars work well in this case.

For cardstock I used apricot appeal, basic black, sage shadow, basic gray, and nouveau chic. For tools I used the color spritzer tool, large and small star punches, the modern label punch, and the word window punch. For accessories I used basic black brads and 1/4" sage shadow grosgrain ribbon. I do not know what it is, but I love the nouveau chic dsp. I will miss some of the colors they are phasing out. Yes, it will be nice having new colors too.

Thanks again for taking the time to look at my little neck of the woods. Please take the time to leave me a comment. I love to hear what you think.

Now go-n-stamp!!